Ampage
DIY Amplifier Gallery
It was only a matter of time before I decided to build an amp. Essentially the tube pedals I've been building are half an amp anyhow, just on a much smaller scale and without deadly voltages. So it seemed only proper to add a little danger to my DIY.
Being moderately sensible I decided to keep it simple for my first and buy a kit. Sure it'd be cheaper to source the bits myself and build from scratch. But it's sensible to build something tried and tested for your first, mainly to learn some good practices. The Ampmaker kits are rather exellent, with cracking instructions. So I went for their Double Six, which appeals to me as it seems a very versatile amp with an emphasis on good cleans.
The first thing I did, which is is about the third thing you do if you follow the instructions in order, was populate the turret board. Whilst doing it became apparent that I need a hotter soldering iron. The 18W one I use for pedals just doesn't cut it. I've got a 25W old one with what can only be described as a chisel on the end of it rather than a tip. This was much better, well apart from the tip... I'll invest in a new iron for the next one.
Next for step one. This was essentially adding the transformers and the power wiring. It's good practice to have this lot all out of the way at one end of the enclosure and to keep this lot away from any of the signal wiring as much as is possible.
Step five-ish. Ta-daa! Simple as that. Actually it is. If you're slow, careful and methodical it's surprisingly easy to build. Everything is just so big in comparison to pedals.
The scary bit for me was the testing phase. Luckily Barry's instructions are superb and it worked perfectly.
The amp was designed with 6V6 power valves in mind, which is what I built it with. But I also had a pair of 6L6GC valves. So in they went and even with the 6V6 biasing, they were much nicer. Barry mentioned to drop the biasing resistors to 270R (the big blue 5W ones). This took them from 14W dissipation with the 560R resistors for the 6V6s up to 20W. Well within the 30W max that the tubes are rated for and as far as we want to go.
Conclusion
I really like this amp. In standard 12 Watt mode (it'll be a little more now) it's clean pretty much all the way around the dial. Plenty of punch and really very nice indeed. The fat switch beefs up the bottom end nicely. The boost switch kicks out the tone stack, well the bass and treble as the mid is later in the circuit. By god it's a big jump in volume along with a hefty slab of crunch with it. This is a suprisingly loud thing when you open it up.
The Watt switch is a great additional feature. 1 Watt mode is crunchy as hell. Of course it loses a ton of headroom, but you can talk over it. The difference between 6 and 12 Watts isn't as large, but there's a fair old volume bump when it's maxed. Funky. If I decide to do a PP18 (likely at this point), I'll put this switch on that also as it uses the same transformer.
Finally it responds superbly to pedals. Mucho important for me obviously.
Boxing It Up
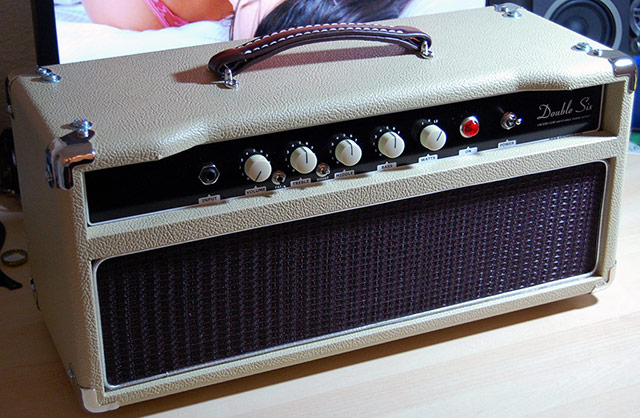
I lack the facilities to do this myself so Martin of MJW Amplification (who's amps are jaw droppingly brilliant) has made me a head cab and a matching 2x10 speaker cab.
Finished
[ back ]