Building Mini Pedals
aka: learning new and inventive swear words
You may want to indulge in a little DIY pedal masochism and as such, I thought I'd put together a guide as to how we do our mini pedals. Now I'm not saying we do it the right way, just this is what has worked for us.
Step 1
Drilling
Before you do anything with these things, you've got to get the basics in there. That's a stomp, two jacks, a power socket and a LED. You want them to be as tight as you can possibly make them to the bottom of the enclosure and the jacks want to be a close to the top of the enclosure as you can. This is really the hard bit. As you need the maximum room you can give yourself for the effect.
The critical bits for us are these power jacks and these jack sockets. We then cut off every connector apart from the tip and ground of the jack sockets. The remaining components are your standard 3PDT stomp and a 3mm LED.
These are the measurements we use. Don't take them as gospel, but they'll give you a good starting point from which to formulate your own.
Measurements
Enclosed jacks - 10mm hole
Stomp - 10.5mm
In Socket - 17mm up & 27mm from end
Out Socket - 17mm up & 44mm from end
Power Jack - 17mm up & 44mm from end
LED - 28mm from end & 7mm from edge
Tiny jacks - 9mm hole
Stomp - 10.5mm
In Socket - 13mm up & 27.5mm from end
Out Socket - 13mm up & 34.5mm from end
Power Jack - 13mm up & 41.5mm from end
LED - 24mm from end & 7mm from edge
17mm Pots
Top row - 16mm down
Bottom row - 23mm down
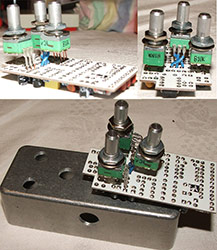
Once you've drilled, trial fit everything to work out where your board will fit and where the pots are going to go. Then drill them also. If you can, try to make the pots board mounted as below. That will make it easier to drop it in.
Step 2
Finishing
The pots we're using are really small. Because of the shortness of the threads we can't use Envirotex. So we've had to go back to our old method of priming, painting, decaling and lacquering. Cleggy wasn't very happy about this. He grumbled quite a bit.
On the plus side, no drilling of Envirotex for me. Indeed as the holes were drilled first, when I put the decals on, I could cut them straight out with a craft knife prior to lacquering. Nice.
Step 3
Installing
It pays to get all the bottom bit in and installed prior to dropping the board in. Put the stomp and lower jack in first. Wire the ground, out and LED negative to the switch. Resistor on the positive, cable from that between where the two stomps are going to be and leave that to one side for now.
Then add the remaing jack and power. Run the out between the sockets (it's best to angle them so the two cutouts are together creating a channel in between). The ground I solder directly to the power ground, and the LED positive line to the positive. Finally I connect a floating power and ground line for the effect, then test I have bypass and a working LED.
Finally connect the ground and power to the board, drop it in and connect the effect in and out. You checked the back would fit on when you trail fitted all this earlier didn't you?
Step 4
Marvel at your awesomeness

Tips
[ back ]